Like many other people who inhabit the fiber arts world, I am a craft supply hoarder. I don’t seek out useful things such as glitter glue and puff paint, nor do I have only pretty things like fancy stitch markers and an attic full of natural fiber yarn. What do I hoard the most? Trash. Garbage. Recycling. Those 4-inch long yarn scraps that you trim off a finished piece after weaving in your ends? I save those. Old pizza boxes? If it’s not greasy, I’m easy! There are infinite ways in which you can turn seemingly useless junk into art – and sometimes that art can even be functional!
The project below features crochet, but whether your craft is crochet, weaving or knitting… read on for a fun and frugal upcycling tutorial!
At some point in our lives, most of us have had clothing to discard. While many of my family’s clothing rejects get donated to local charities, some things just aren’t in good enough condition to pass along. And for some reason, nothing feels more wrong to me than throwing fabric away. So I turn it into yarn.

There are many different approaches to cutting fabric into strips for yarn. The thing is, each garment is different – those stained pajama pants aren’t going to cut up the same way your 7-year-old’s worn out Halloween costume will, for instance. So what I do first is trim off anything that won’t be crochet-able. That means whatever won’t wrap around the hook: buttons, wide elastic bands, thick seams, zippers, pockets, etc. If I can crochet with it, I keep it.

Whatever the piece is that you’re cutting up, the first step is to remove the hard, stiff, and unworkable bits. Keep in mind, some waist bands can be included to your yarn if they’re flexible and narrow enough to work with. After cutting those parts off, I try to make the garment into a flat piece of fabric. Making as few cuts as possible and leaving some seams intact, spread out your piece so that it can pretty much lay flat on the floor or cutting surface.

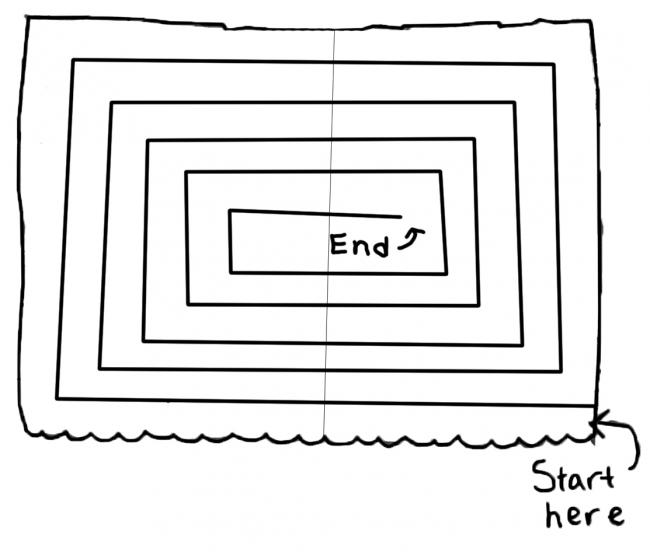
Again, there are many ways to approach this step. No matter what the shape I’m cutting up is, I always try to cut it in a spiral, working from the outside in. I feel like this creates the most amount of yardage. The less waste, the better!
If it is a skirt, the body of a shirt, or the leg of pants you can also cut the tube in a spiral, just be aware that the seams will make bumps! This is probably the right time to warn you: This yarn does not hide the fact that it was made from rags. My personal preference is to let the seams, corners, knots, and other bumps in the road help to create the delightful scrappy texture of a truly recycled piece.
If you’re a weaver, follow the same steps to create yarn and then warp up your loom for plain weave with something sturdy in fun colors. We recommend Cotton Carpet Warp 8/4 Yarn at a sett of about 10 EPI (ends per inch). You may even sett it looser if your upcycled weft is especially thick. We recommend a sturdy stick shuttle, and this project can even be done on a rigid heddle loom.

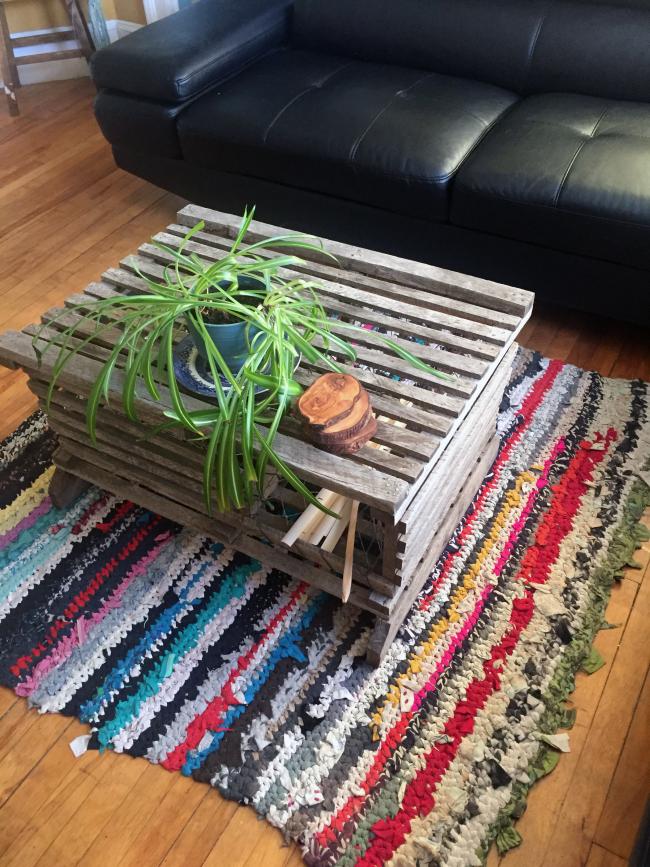
This crochet rug is a constant work in progress, even though it’s been in use for a few years at this point! When I have enough fabric to make more rag yarn, I just keep adding rows to one end or the other.
Want to try this at home? Here’s how:
• You’ll need a lot of discarded fabric stuff. Gather up old sheets, clothing, towels, and any other fabric you come across that is thin enough to cut into strips and flexible enough to crochet with.
• Spiral cut one item at a time. Try to cut your strips about 1″ to 2″ wide. Use either sharp scissors, or pinking shears, or you can use a Strip-It Cloth Slitter.
• Wind the strip into a ball when finished cutting. You can keep these balls of spiraled fabric separate if you’re planning a color pattern (see notes below). Otherwise just knot the end of the first one with the beginning of the next one and keep on adding to it.
• If you’re worried about these knots coming apart, you can also sew the ends together. I will say though, my rug has been in a high traffic area for almost 3 years now. My husband (much to my horror) has even put it through the washing machine a few times, and none of my knots have come apart. Yet.
• Choose a big crochet hook, although the exact size doesn’t matter too much. I’ve been using a size P crochet hook; depending on the average thickness and floppiness of your new yarn you may want something a size or two smaller. The Susan Bates Crystalite Crochet Hooks L,M,N and P Set offers a perfect array if you don’t have any of those sizes at home already.
• To determine the width of the rug, I just made a chain and threw it on the floor a few times until it looked like a good size. From there on out, you simply single crochet back and forth.

Some notes on color planning:
Some may find my rug a little bit too colorful. I didn’t put any planning into the color arrangement whatsoever – whatever I pulled out of my fabric bag is what was added next. With upcycled projects like this one, you don’t always have the exact shades you need for a perfectly matching color scheme, that’s part of the spontaneous beauty of it! That said, you can always try to group similar shades and do the usual kind of color planning that you would for other projects. Just think of it like working with a variegated yarn, go with colors you like and be delighted by the surprises!
What to expect:
• Using so many different fabric types as well as having normal variations in strip widths can make it tough to maintain perfectly straight edges. I encourage you to embrace the unpredictable and let your rug take on whatever shape it wants.
• Ok, ok. So maybe my messy edges aren’t ALL due to gauge differences. As a novice crocheter, sometimes it’s hard to know which stitch is first or last! This is a forgiving project for those of us who really want to crochet something, but really don’t want to have to focus too hard on it. Again, I encourage you to let your rug take on whatever shape it wants!
• If you (like me) are trying to use as much of your discarded clothing as possible for yarn, go ahead and spiral cut across seams. Your yarn will have these seams and slightly wider points where you’ve turned corners. I’ve even left pockets on T-shirts and cut through those. Again, this only adds to the true “rag” texture and I think it’s A-OK.

P.S.
Lastly, I would just like to point out something really cool. In the above photo, you can see some white plastic pieces sticking out of my lobster trap/coffee table. I thought I had cleaned the area enough for a nice photo, but there’s always something, right? Anyhow, those white plastic things are actually slats from an old window blind. I found them rolled up in some woven yardage I was removing from a hand-me-down loom. The original owner had been using these slats between layers as she wound on her warp to keep her tension even on the beam, instead of wooden pieces, paper, or rolls of cardboard. After sharing this idea with other weavers we agreed this was a terrific idea and I use those slats every time I use that loom out of appreciation for the other craft supply hoarder out there who upcycled them in the first place.
Share your upcycling stories with us in the comments, or on facebook or instagram!
#upcycle #halcyonyarn

